AlexNet 笔记
论文精读
The neural network, which has 60 million parameters and 650,000 neurons, consists of five convolutional layers, some of which are followed by max-pooling layers, and three fully-connected layers with a final 1000-way softmax. To make training faster, we used non-saturating neurons and a very efficient GPU implementation of the convolution operation. To reduce overfitting in the fully-connected layers we employed a recently-developed regularization method called “dropout” that proved to be very effective.
-
ReLU Nonlinearity
-
Training on Multiple GPUs
切图,怎么在多个GPU上训练的细节
-
Local Response Normalization(没用
-
Overall Architecture
-
Reducing Overfitting
-
Data Augmentation
PCA(通道颜色上的变换)、抠图成224*224
-
Dropout(50%)
-
-
Details of learning
用的SGD调参(虽然不够稳定,但里面的噪音对模型的泛化有好处,现在变得主流)
0.9是momentum(适用于优化的表面非常不平滑,以免掉坑),0.0005是weight decay
初始化:均值为0,方差0.01(Bert0.02)的高斯分布
The learning rate was initialized at 0.01 and reduced three times prior to termination(不动了降低十倍)
现在学习率用cos函数(更平滑)
补充知识
激活函数
Normalization
深度学习常用的 Normalization 方法:BN、LN、IN、GN-腾讯云开发者社区-腾讯云 (tencent.com)
Data Augmentation
| [方法汇总 | Pytorch实现常见数据增强(Data Augmentation)【附源码】_深度学习中数据增强代码-CSDN博客](https://blog.csdn.net/qq_42589613/article/details/141367923) |
Dropout
Dropout的深入理解(基础介绍、模型描述、原理深入、代码实现以及变种)-CSDN博客
SGD
【优化器】(一) SGD原理 & pytorch代码解析_sgd优化器-CSDN博客
weight decay(L2正则项)
权重衰减weight_decay参数从入门到精通_weight decay-CSDN博客
网络介绍:
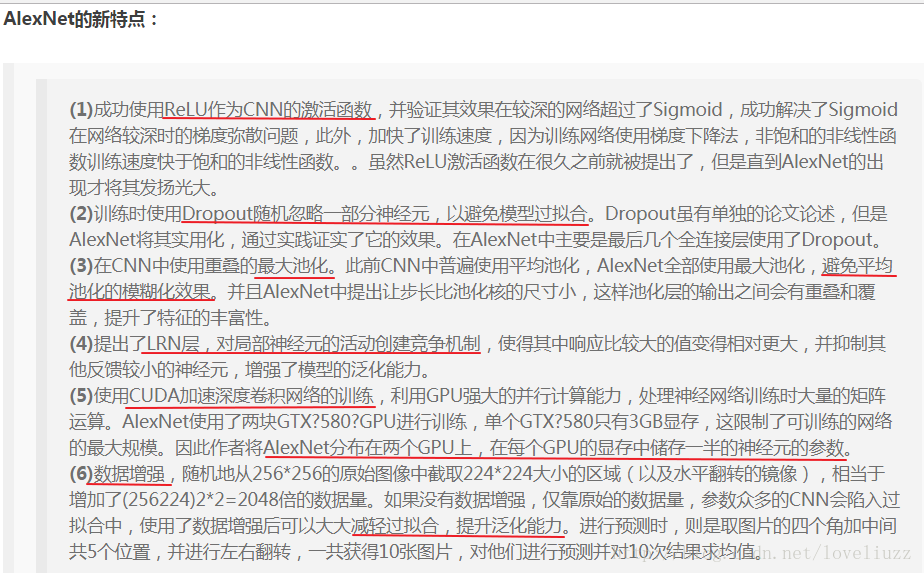
- ImageNet2012竞赛第一名;他标志着DNN深度学习革命的开始;
- 网络包含5个卷积层+3个全连接层;
- 60M个参数+650K个神经元;
- 2个分组——>2个GPU(3G,受限于当时硬件),训练时长一周,50x加速;
- 引入的新技术有:
ReLU – 非线性激活;
Max pooling – 池化;
Dropout regularization – 用于防止过拟合,在判断决策的FC层使用;
模型网络框图:
两个GPU:

输入图片大小理论上应为227X227X3(大小为227*227的RGB图)
每一层的结构:
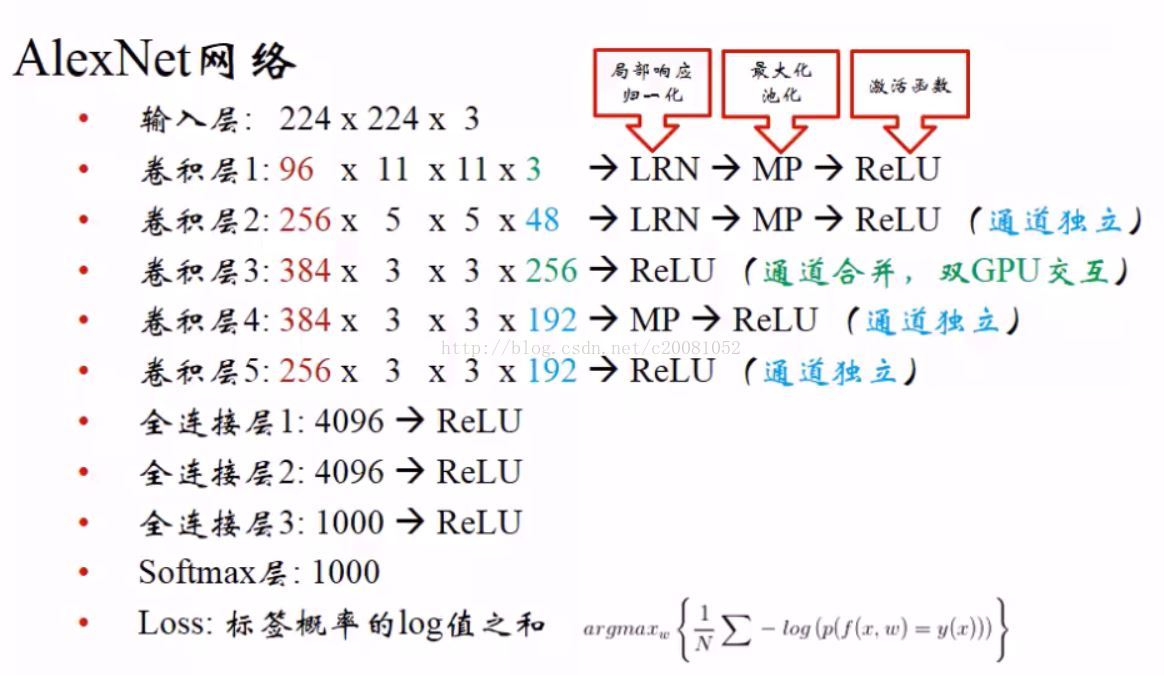
其中LRN为局部响应归一化,具体解释可参考文章: http://blog.csdn.net/hduxiejun/article/details/70570086
AlexNet网络结构详解(含各层维度大小计算过程)与PyTorch实现-CSDN博客
AlexNet实现
PyTorch——AlexNet实现(附完整代码)-CSDN博客
加载数据
使用“Fashion-MNIST”数据集。读取数据的时候我们额外做了一步将图像高和宽扩大到AlexNet使用的图像高和宽224。这个可以通过torchvision.transforms.Resize实例来实现。也就是说,我们在ToTensor实例前使用Resize实例,然后使用Compose实例来将这两个变换串联。
def load_data_fashion_mnist(batch_size, resize=None, root='~/Datasets/FashionMNIST'):
    if sys.platform.startswith('win'):
        num_workers = 0
    else:
        num_workers = 4
    trans = []
    if resize:
        trans.append(torchvision.transforms.Resize(size=resize))
    trans.append(torchvision.transforms.ToTensor())

    transform = torchvision.transforms.Compose(trans)
    mnist_train = torchvision.datasets.FashionMNIST(root=root, train=True, download=True, transform=transform)
    mnist_test = torchvision.datasets.FashionMNIST(root=root, train=False, download=True, transform=transform)

    train_iter = torch.utils.data.DataLoader(mnist_train, batch_size=batch_size, shuffle=True, num_workers=num_workers)
    test_iter = torch.utils.data.DataLoader(mnist_test, batch_size=batch_size, shuffle=False, num_workers=num_workers)

    return train_iter, test_iter

batch_size = 128
train_iter, test_iter = load_data_fashion_mnist(batch_size, resize=224)
构建模型
class AlexNet(nn.Module):
    def __init__(self):
        super(AlexNet, self).__init__()
        self.conv = nn.Sequential(
            nn.Conv2d(1, 96, 11, 4), # in_channels, out_channels, kernel_size, stride, padding
            nn.ReLU(),
            nn.MaxPool2d(3, 2), # kernel_size, stride
            # 减小卷积窗口,使用填充为2来使得输入与输出的高和宽一致,且增大输出通道数
            nn.Conv2d(96, 256, 5, 1, 2),
            nn.ReLU(),
            nn.MaxPool2d(3, 2),
            # 连续3个卷积层,且使用更小的卷积窗口。除了最后的卷积层外,进一步增大了输出通道数。
            nn.Conv2d(256, 384, 3, 1, 1),
            nn.ReLU(),
            nn.Conv2d(384, 384, 3, 1, 1),
            nn.ReLU(),
            nn.Conv2d(384, 256, 3, 1, 1),
            nn.ReLU(),
            nn.MaxPool2d(3, 2)
        )
        self.fc = nn.Sequential(
            nn.Linear(256*5*5, 4096),
            nn.ReLU(),
            nn.Dropout(0.5),
            nn.Linear(4096, 4096),
            nn.ReLU(),
            nn.Dropout(0.5),
            nn.Linear(4096, 10),
        )

    def forward(self, img):
        feature = self.conv(img)
        output = self.fc(feature.view(img.shape[0], -1))
        return output
损失函数
损失函数使用交叉熵损失。
loss = torch.nn.CrossEntropyLoss()
优化方法
优化方法使用Adam算法。
optimizer = torch.optim.Adam(net.parameters(), lr=lr)
完整代码
import time
import torch
from torch import nn, optim
import torchvision
import sys

device = torch.device('cuda' if torch.cuda.is_available() else 'cpu')

def load_data_fashion_mnist(batch_size, resize=None, root='~/Datasets/FashionMNIST'):
    if sys.platform.startswith('win'):
        num_workers = 0
    else:
        num_workers = 4
    trans = []
    if resize:
        trans.append(torchvision.transforms.Resize(size=resize))
    trans.append(torchvision.transforms.ToTensor())

    transform = torchvision.transforms.Compose(trans)
    mnist_train = torchvision.datasets.FashionMNIST(root=root, train=True, download=True, transform=transform)
    mnist_test = torchvision.datasets.FashionMNIST(root=root, train=False, download=True, transform=transform)

    train_iter = torch.utils.data.DataLoader(mnist_train, batch_size=batch_size, shuffle=True, num_workers=num_workers)
    test_iter = torch.utils.data.DataLoader(mnist_test, batch_size=batch_size, shuffle=False, num_workers=num_workers)

    return train_iter, test_iter

batch_size = 128
train_iter, test_iter = load_data_fashion_mnist(batch_size, resize=224)

class AlexNet(nn.Module):
    def __init__(self):
        super(AlexNet, self).__init__()
        self.conv = nn.Sequential(
            nn.Conv2d(1, 96, 11, 4), # in_channels, out_channels, kernel_size, stride, padding
            nn.ReLU(),
            nn.MaxPool2d(3, 2), # kernel_size, stride
            # 减小卷积窗口,使用填充为2来使得输入与输出的高和宽一致,且增大输出通道数
            nn.Conv2d(96, 256, 5, 1, 2),
            nn.ReLU(),
            nn.MaxPool2d(3, 2),
            # 连续3个卷积层,且使用更小的卷积窗口。除了最后的卷积层外,进一步增大了输出通道数。
            nn.Conv2d(256, 384, 3, 1, 1),
            nn.ReLU(),
            nn.Conv2d(384, 384, 3, 1, 1),
            nn.ReLU(),
            nn.Conv2d(384, 256, 3, 1, 1),
            nn.ReLU(),
            nn.MaxPool2d(3, 2)
        )
        self.fc = nn.Sequential(
            nn.Linear(256*5*5, 4096),
            nn.ReLU(),
            nn.Dropout(0.5),
            nn.Linear(4096, 4096),
            nn.ReLU(),
            nn.Dropout(0.5),
            nn.Linear(4096, 10),
        )

    def forward(self, img):
        feature = self.conv(img)
        output = self.fc(feature.view(img.shape[0], -1))
        return output

net = AlexNet()

def evaluate_accuracy(data_iter, net, device=None):
    if device is None and isinstance(net, torch.nn.Module):
        # 如果没指定device就使用net的device
        device = list(net.parameters())[0].device
    acc_sum, n = 0.0, 0
    with torch.no_grad():
        for X, y in data_iter:
            net.eval() # 评估模式, 这会关闭dropout
            acc_sum += (net(X.to(device)).argmax(dim=1) == y.to(device)).float().sum().cpu().item()
            net.train() # 改回训练模式
            n += y.shape[0]
    return acc_sum / n


def train(net, train_iter, test_iter, batch_size, optimizer, device, num_epochs):
    net = net.to(device)
    print("training on ", device)
    loss = torch.nn.CrossEntropyLoss()
    for epoch in range(num_epochs):
        train_l_sum, train_acc_sum, n, batch_count, start = 0.0, 0.0, 0, 0, time.time()
        for X, y in train_iter:
            X = X.to(device)
            y = y.to(device)
            y_hat = net(X)
            l = loss(y_hat, y)
            optimizer.zero_grad()
            l.backward()
            optimizer.step()
            train_l_sum += l.cpu().item()
            train_acc_sum += (y_hat.argmax(dim=1) == y).sum().cpu().item()
            n += y.shape[0]
            batch_count += 1
        test_acc = evaluate_accuracy(test_iter, net)
        print('epoch %d, loss %.4f, train acc %.3f, test acc %.3f, time %.1f sec'
              % (epoch + 1, train_l_sum / batch_count, train_acc_sum / n, test_acc, time.time() - start))

lr, num_epochs = 0.001, 5
optimizer = torch.optim.Adam(net.parameters(), lr=lr)
train(net, train_iter, test_iter, batch_size, optimizer, device, num_epochs)
pytorch实现AlexNet(含完整代码)_pytorch alexnet-CSDN博客
AlexNet总结
</center>
- ResNet的创新主要集中在解决梯度消失问题上,允许构建非常深的网络,从而提高性能。
- VGGNet采用了相对简单的网络结构,通过卷积层的堆叠和小卷积核的使用提供了良好的性能。
- AlexNet是深度学习的先驱,证明了深度卷积神经网络的潜力。它的创新包括使用多GPU、卷积层和Dropout正则化。
Discussion
神经网络的公平性?